
시작하기
이 글은 앞으로도 계속 업데이트 될 예정입니다.
구글의 자격증은 매우 비싸다. 그런데 유효기간은 2년밖에 안된다. 아 클라우드… 소프트웨어는 왜 자고 일어나면 휙휙 바뀌어있는건데 ㅡㅡ
만료되면 또 공부를 해야하나 해서 두려움에 떨고 있었는데, 그런 나를 구원해주는 것을 발견했다. 그건 바로 Google Skills였다고…
그놈의 티셔츠를 받으려고 Google StudyJam에 들어가서 개인적으로 공부하고 있는데, 자격증 목록에 들어가보니까 수업을 들으면 재갱신을 해준다고 하더라…!
참고로 다음 옵션 중 하나를 선택하고 완료해야 한다고 한다.
전제조건: 만료 12개월 내에
- 기술 배지 2개
- 기술 배지 1개 + 과정 2개
- 과정 4개 완료
자격증 재갱신 코스
Professional Cloud Architect Certification Renewal via Google Skills
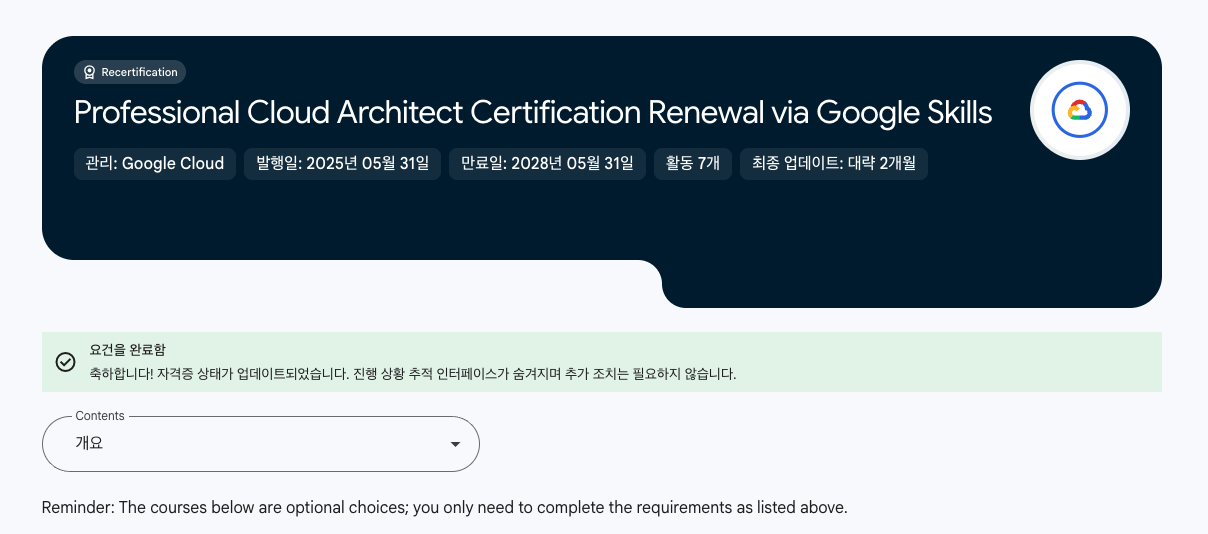
나는 기술 배지 2개로 자격증을 갱신했는데, 최대 1년만 연장을 해주는 듯 하다. 근데 AI한테 물어보니까 기간만 잘 지키면 시험을 안보고도 계속 연장 할 수 있다고 한다. 스터디잼 신청해서 크래딧 공짜로 받고 공부하면 될 듯?
그리고 이게 한정인지는 모르겠지만, 재갱신을 하면 구글 자격증 50% 할인 쿠폰도 같이 들어온다. 혹여나 다른 구글 자격증 필요한 사람 있으심 참고하시길
Google Cloud에서 Terraform으로 인프라 빌드
- LAB: Google Cloud에서 Terraform으로 인프라 빌드: 챌린지 실습
- ID: GSP345
- 5 Credits
작업 0. Terraform 설치
# 1. Terraform 설치
cat <<'EOF' > ~/.customize_environment
wget -O - https://apt.releases.hashicorp.com/gpg | sudo gpg --dearmor -o /usr/share/keyrings/hashicorp-archive-keyring.gpg
echo "deb [arch=$(dpkg --print-architecture) signed-by=/usr/share/keyrings/hashicorp-archive-keyring.gpg] https://apt.releases.hashicorp.com $(grep -oP '(?<=UBUNTU_CODENAME=).*' /etc/os-release || lsb_release -cs) main" | sudo tee /etc/apt/sources.list.d/hashicorp.list
sudo apt update && sudo apt install -y terraform
EOF
bash ~/.customize_environment

# 2. 버전 확인
terraform --version
작업 1. 구성 파일 만들기
# 1. 프로젝트/존
export PROJECT_ID=$(gcloud config get-value project)
export ZONE=$(gcloud compute instances list --filter="name=tf-instance-1" --format="value(zone.basename())")
export ZONE=${ZONE:-$(gcloud config get-value compute/zone)}
export REGION=${ZONE%-*}
echo "PROJECT_ID=$PROJECT_ID ZONE=$ZONE REGION=$REGION"

# 2. 디렉터리
mkdir -p modules/instances modules/storage

# 3. variables.tf
cat <<EOF > variables.tf
variable "region" {
  type    = string
  default = "${REGION}"
}
variable "zone" {
  type    = string
  default = "${ZONE}"
}
variable "project_id" {
  type    = string
  default = "${PROJECT_ID}"
}
EOF
cp variables.tf modules/instances/variables.tf
cp variables.tf modules/storage/variables.tf

# 4. main.tf
cat <<EOF > main.tf
terraform {
  required_providers {
    google = {
      source = "hashicorp/google"
    }
  }
}

provider "google" {
  project = var.project_id
  region  = var.region
  zone    = var.zone
}

module "instances" {
  source     = "./modules/instances"
  region     = var.region
  zone       = var.zone
  project_id = var.project_id
}
EOF

# 5. 빈 모듈 파일
touch modules/instances/instances.tf modules/instances/outputs.tf
touch modules/storage/storage.tf modules/storage/outputs.tf

# 6. 초기화
terraform init -upgrade
작업 2. 인프라 가져오기
# 1. 기존 인스턴스 확인
gcloud compute instances list --filter="name=tf-instance-1 OR name=tf-instance-2"

# 2. instances.tf
cat <<'EOF' > modules/instances/instances.tf
resource "google_compute_instance" "tf-instance-1" {
  name         = "tf-instance-1"
  machine_type = "e2-micro"
  zone         = var.zone

  boot_disk {
    initialize_params {
      image = "debian-cloud/debian-12"
    }
  }

  network_interface {
    network = "default"
  }

  metadata_startup_script = <<-EOT
        #!/bin/bash
    EOT
  allow_stopping_for_update = true
}

resource "google_compute_instance" "tf-instance-2" {
  name         = "tf-instance-2"
  machine_type = "e2-micro"
  zone         = var.zone

  boot_disk {
    initialize_params {
      image = "debian-cloud/debian-12"
    }
  }

  network_interface {
    network = "default"
  }

  metadata_startup_script = <<-EOT
        #!/bin/bash
    EOT
  allow_stopping_for_update = true
}
EOF

# 3. import
terraform import module.instances.google_compute_instance.tf-instance-1 ${PROJECT_ID}/${ZONE}/tf-instance-1
terraform import module.instances.google_compute_instance.tf-instance-2 ${PROJECT_ID}/${ZONE}/tf-instance-2

# 4. apply
terraform plan
terraform apply -auto-approve
작업 3. 원격 백엔드 구성
# 1. 버킷 이름
export BUCKET_NAME=tf-bucket-298731

# 2. storage.tf
cat <<EOF > modules/storage/storage.tf
resource "google_storage_bucket" "tf-bucket" {
  name                        = "${BUCKET_NAME}"
  location                    = "US"
  force_destroy               = true
  uniform_bucket_level_access = true
}
EOF

# 3. storage 모듈 추가
cat <<EOF >> main.tf

module "storage" {
  source     = "./modules/storage"
  region     = var.region
  zone       = var.zone
  project_id = var.project_id
}
EOF
terraform init
terraform apply -auto-approve

# 4. GCS 백엔드
cat <<EOF > main.tf
terraform {
  backend "gcs" {
    bucket = "${BUCKET_NAME}"
    prefix = "terraform/state"
  }
  required_providers {
    google = {
      source = "hashicorp/google"
    }
  }
}

provider "google" {
  project = var.project_id
  region  = var.region
  zone    = var.zone
}

module "instances" {
  source     = "./modules/instances"
  region     = var.region
  zone       = var.zone
  project_id = var.project_id
}

module "storage" {
  source     = "./modules/storage"
  region     = var.region
  zone       = var.zone
  project_id = var.project_id
}
EOF

# 5. state 마이그레이션 (yes)
terraform init -migrate-state
작업 4. 인프라 수정 및 업데이트
# 1. instances.tf — e2-standard-2 + 세 번째 VM (랩 정보 패널 Instance Name)
export INSTANCE_3=tf-instance-782551

cat <<EOF > modules/instances/instances.tf
resource "google_compute_instance" "tf-instance-1" {
  name         = "tf-instance-1"
  machine_type = "e2-standard-2"
  zone         = var.zone

  boot_disk {
    initialize_params {
      image = "debian-cloud/debian-12"
    }
  }

  network_interface {
    network = "default"
  }

  metadata_startup_script = <<-EOT
        #!/bin/bash
    EOT
  allow_stopping_for_update = true
}

resource "google_compute_instance" "tf-instance-2" {
  name         = "tf-instance-2"
  machine_type = "e2-standard-2"
  zone         = var.zone

  boot_disk {
    initialize_params {
      image = "debian-cloud/debian-12"
    }
  }

  network_interface {
    network = "default"
  }

  metadata_startup_script = <<-EOT
        #!/bin/bash
    EOT
  allow_stopping_for_update = true
}

resource "google_compute_instance" "tf-instance-3" {
  name         = "${INSTANCE_3}"
  machine_type = "e2-standard-2"
  zone         = var.zone

  boot_disk {
    initialize_params {
      image = "debian-cloud/debian-12"
    }
  }

  network_interface {
    network = "default"
  }

  metadata_startup_script = <<-EOT
        #!/bin/bash
    EOT
  allow_stopping_for_update = true
}
EOF

# 2. apply
terraform apply -auto-approve
작업 5. 리소스 폐기
# 1. 세 번째 인스턴스만 빼고 instances.tf 다시 작성
cat <<'EOF' > modules/instances/instances.tf
resource "google_compute_instance" "tf-instance-1" {
  name         = "tf-instance-1"
  machine_type = "e2-standard-2"
  zone         = var.zone

  boot_disk {
    initialize_params {
      image = "debian-cloud/debian-12"
    }
  }

  network_interface {
    network = "default"
  }

  metadata_startup_script = <<-EOT
        #!/bin/bash
    EOT
  allow_stopping_for_update = true
}

resource "google_compute_instance" "tf-instance-2" {
  name         = "tf-instance-2"
  machine_type = "e2-standard-2"
  zone         = var.zone

  boot_disk {
    initialize_params {
      image = "debian-cloud/debian-12"
    }
  }

  network_interface {
    network = "default"
  }

  metadata_startup_script = <<-EOT
        #!/bin/bash
    EOT
  allow_stopping_for_update = true
}
EOF

# 2. apply
terraform apply -auto-approve
작업 6. 레지스트리의 모듈 사용
# 1. main.tf — vpc 모듈 추가 (랩 정보 패널 VPC Name)
export VPC_NAME=tf-vpc-741951

cat <<EOF > main.tf
terraform {
  backend "gcs" {
    bucket = "${BUCKET_NAME}"
    prefix = "terraform/state"
  }
  required_providers {
    google = {
      source = "hashicorp/google"
    }
  }
}

provider "google" {
  project = var.project_id
  region  = var.region
  zone    = var.zone
}

module "instances" {
  source     = "./modules/instances"
  region     = var.region
  zone       = var.zone
  project_id = var.project_id
}

module "storage" {
  source     = "./modules/storage"
  region     = var.region
  zone       = var.zone
  project_id = var.project_id
}

module "vpc" {
  source  = "terraform-google-modules/network/google"
  version = "10.0.0"

  project_id   = var.project_id
  network_name = "${VPC_NAME}"
  routing_mode = "GLOBAL"

  subnets = [
    {
      subnet_name   = "subnet-01"
      subnet_ip     = "10.10.10.0/24"
      subnet_region = var.region
    },
    {
      subnet_name   = "subnet-02"
      subnet_ip     = "10.10.20.0/24"
      subnet_region = var.region
    }
  ]
}
EOF

# 2. VPC 생성
terraform init
terraform apply -auto-approve

# 3. instances.tf — tf-instance-1 → subnet-01, tf-instance-2 → subnet-02
cat <<EOF > modules/instances/instances.tf
resource "google_compute_instance" "tf-instance-1" {
  name         = "tf-instance-1"
  machine_type = "e2-standard-2"
  zone         = var.zone

  boot_disk {
    initialize_params {
      image = "debian-cloud/debian-12"
    }
  }

  network_interface {
    network    = "${VPC_NAME}"
    subnetwork = "subnet-01"
  }

  metadata_startup_script = <<-EOT
        #!/bin/bash
    EOT
  allow_stopping_for_update = true
}

resource "google_compute_instance" "tf-instance-2" {
  name         = "tf-instance-2"
  machine_type = "e2-standard-2"
  zone         = var.zone

  boot_disk {
    initialize_params {
      image = "debian-cloud/debian-12"
    }
  }

  network_interface {
    network    = "${VPC_NAME}"
    subnetwork = "subnet-02"
  }

  metadata_startup_script = <<-EOT
        #!/bin/bash
    EOT
  allow_stopping_for_update = true
}
EOF

# 4. apply
terraform apply -auto-approve
작업 7. 방화벽 구성
# 1. tf-firewall
cat <<EOF >> main.tf

resource "google_compute_firewall" "tf-firewall" {
  name    = "tf-firewall"
  network = "projects/${PROJECT_ID}/global/networks/${VPC_NAME}"

  allow {
    protocol = "tcp"
    ports    = ["80"]
  }

  source_ranges = ["0.0.0.0/0"]
}
EOF

# 2. apply
terraform apply -auto-approve
Google Cloud에서 Cloud 보안 기본사항 구현하기
- LAB: Google Cloud에서 Cloud 보안 기본사항 구현하기
- ID: GSP342
- 5 Credits
# 0. 환경 변수
export PROJECT_ID=$(gcloud config get-value project)
export REGION="us-east1"
export ZONE="us-east1-b"
export SUBNET_NAME="orca-build-subnet"
export JUMPHOST_INTERNAL_IP="192.168.10.2"
작업 1. 커스텀 보안 역할 만들기
# 1. 커스텀 역할
gcloud iam roles create orca_storage_editor_975 \
    --project=$PROJECT_ID \
    --title="Orca Storage Editor" \
    --description="Custom storage editor role for Orca team" \
    --permissions="storage.buckets.get,storage.objects.get,storage.objects.list,storage.objects.update,storage.objects.create" \
    --stage="GA"
작업 2. 서비스 계정 만들기
# 1. 클러스터용 SA
gcloud iam service-accounts create orca-private-cluster-791-sa \
    --display-name="Orca Private Cluster Service Account"
작업 3. 커스텀 보안 역할을 서비스 계정에 바인딩
# 1. SA 이메일
export SA="orca-private-cluster-791-sa@${PROJECT_ID}.iam.gserviceaccount.com"

# 2. 모니터링/로깅 + 커스텀 역할
gcloud projects add-iam-policy-binding $PROJECT_ID \
    --member="serviceAccount:$SA" \
    --role="roles/monitoring.viewer"

gcloud projects add-iam-policy-binding $PROJECT_ID \
    --member="serviceAccount:$SA" \
    --role="roles/monitoring.metricWriter"

gcloud projects add-iam-policy-binding $PROJECT_ID \
    --member="serviceAccount:$SA" \
    --role="roles/logging.logWriter"

gcloud projects add-iam-policy-binding $PROJECT_ID \
    --member="serviceAccount:$SA" \
    --role="projects/$PROJECT_ID/roles/orca_storage_editor_975"
작업 4. 새 Kubernetes Engine 비공개 클러스터 만들기 및 구성
# 1. 비공개 클러스터
gcloud container clusters create orca-cluster-794 \
    --project=$PROJECT_ID \
    --zone=$ZONE \
    --network="orca-build-vpc" \
    --subnetwork=$SUBNET_NAME \
    --service-account="orca-private-cluster-791-sa@$PROJECT_ID.iam.gserviceaccount.com" \
    --enable-ip-alias \
    --enable-private-nodes \
    --enable-private-endpoint \
    --enable-master-authorized-networks \
    --master-authorized-networks="$JUMPHOST_INTERNAL_IP/32"
작업 5. 비공개 Kubernetes Engine 클러스터에 애플리케이션 배포
Cloud Shell이 아니라 orca-jumphost SSH 안에서 실행.
# 1. jumphost SSH
gcloud compute ssh orca-jumphost --zone=$ZONE

# 2. jumphost 안에서 — 플러그인 + 클러스터 인증 (--internal-ip)
sudo apt-get update && sudo apt-get install -y google-cloud-sdk-gke-gcloud-auth-plugin
echo "export USE_GKE_GCLOUD_AUTH_PLUGIN=True" >> ~/.bashrc
source ~/.bashrc

gcloud container clusters get-credentials orca-cluster-794 \
    --internal-ip \
    --zone=$ZONE \
    --project=$PROJECT_ID

# 3. 배포 확인
kubectl create deployment hello-server --image=gcr.io/google-samples/hello-app:1.0
kubectl get pods![[Google Skills] Cloud Vision API로 이미지 분석](/coverImages/gcp.png)